
个人博客部署
1、JDK17
wget http://49.232.8.65/jdk/jdk17/jdk-17_linux-x64_bin.tar.gz
tar -zxvf jdk-17_linux-x64_bin.tar.gz
vim /etc/profile
# 文件添加如下内容
export JAVA_HOME=jdk文件夹全路径
export PATH=$JAVA_HOME/bin:$PATH
export CLASSPATH=.:$JAVA_HOME/lib/dt.jar:$JAVA_HOME/lib/tools.jar
# 刷新配置使其生效
source /etc/profile
# 查看安装的版本
java -version
2、MySQL
具体教程可以参考
二 安装mysql[^1]
3、Redis
wget http://download.redis.io/releases/redis-6.2.7.tar.gz
tar -zxvf redis-6.2.7.tar.gz
cd redis-6.2.7
make
make PREFIX=/usr/local/src/redis-6.2.7 install
cp redis.conf /usr/local/src/redis-6.2.7/bin
vim redis.conf
# 文件修改如下内容
# 1、允许访问的地址,默认是127.0.0.1,会导致只能在本地访问。修改为0.0.0.0则可以在任意IP访问
bind 0.0.0.0
# 2、守护进程,修改为yes后即可后台运行
daemonize yes
# 3、密码,设置后访问Redis必须输入密码
requirepass X7#kLp!2fQ@5z
# 启动Redis
cd /usr/local/src/redis-6.2.7/bin
./redis-server redis.conf
4、Nginx
具体教程可以参考
配置可以参考
HTTPS:
worker_processes  1;

events {
    worker_connections  1024;
}


http {
    include       mime.types;
    default_type  application/octet-stream;
    sendfile        on;

    keepalive_timeout  65;

    # HTTPS server
    #
    server {
        listen       				443 ssl;
        server_name  				自己的域名或者云服务器IP;

        client_max_body_size 			5m;

        ssl_certificate      			云服务器.crt的ssl文件;
        ssl_certificate_key  			云服务器.key的ssl文件;

        ssl_session_cache    			shared:SSL:1m;
        ssl_session_timeout  			5m;
        ssl_protocols				TLSv1 TLSv1.1 TLSv1.2;

        ssl_ciphers  				HIGH:!aNULL:!MD5;
        ssl_prefer_server_ciphers  		on;

        location / {
            root   /usr/local/nginx/html/dist;
            index  index.html index.htm;
            try_files 	$uri $uri/ /index.html;
        }

        location /admin {
            alias   /usr/local/nginx/html/admin/dist;
            index  index.html index.htm;
            try_files 	$uri $uri/ /admin/index.html;
        }


        location /api/{
        	proxy_pass http://[服务器地址]:8080/;
        }
    }

}
HTTP:
#user  nobody;
worker_processes  1;
#error_log  logs/error.log;
#error_log  logs/error.log  notice;
#error_log  logs/error.log  info;
#pid        logs/nginx.pid;
events {
    worker_connections  1024;
}
http {
    include       mime.types;
    default_type  application/octet-stream;
    #log_format  main  '$remote_addr - $remote_user [$time_local] "$request" '
    #                  '$status $body_bytes_sent "$http_referer" '
    #                  '"$http_user_agent" "$http_x_forwarded_for"';
    #access_log  logs/access.log  main;
    sendfile        on;
    #tcp_nopush     on;
    #keepalive_timeout  0;
    keepalive_timeout  65;
    #gzip  on;
    server {
        listen       80;
        server_name  localhost;
        #charset koi8-r;
        #access_log  logs/host.access.log  main;
        location / {
            root   /usr/local/nginx/html/dist;
            index  index.html index.htm;
            try_files $uri $uri/ /index.html;
        }
        #error_page  404              /404.html;
        # redirect server error pages to the static page /50x.html
        #
        error_page   500 502 503 504  /50x.html;
        location /admin {
            alias   /usr/local/nginx/html/admin/dist;
            index index.html index.htm;
            try_files $uri $uri/ /index.html;
        }
        # proxy the PHP scripts to Apache listening on 127.0.0.1:80
        #
        #location ~ \.php$ {
        #    proxy_pass   http://127.0.0.1;
        #}
        location /api/{
            proxy_pass http://www.qiuqingsheng.fun:48080/;
        }
        # pass the PHP scripts to FastCGI server listening on 127.0.0.1:9000
        #
        #location ~ \.php$ {
        #    root           html;
        #    fastcgi_pass   127.0.0.1:9000;
        #    fastcgi_index  index.php;
        #    fastcgi_param  SCRIPT_FILENAME  /scripts$fastcgi_script_name;
        #    include        fastcgi_params;
        #}
        # deny access to .htaccess files, if Apache's document root
        # concurs with nginx's one
        #
        #location ~ /\.ht {
        #    deny  all;
        #}
    }
    # another virtual host using mix of IP-, name-, and port-based configuration
    #
    #server {
    #    listen       8000;
    #    listen       somename:8080;
    #    server_name  somename  alias  another.alias;
    #    location / {
    #        root   html;
    #        index  index.html index.htm;
    #    }
    #}
    # HTTPS server
    #
    #server {
    #    listen       443 ssl;
    #    server_name  localhost;
    #    ssl_certificate      cert.pem;
    #    ssl_certificate_key  cert.key;
    #    ssl_session_cache    shared:SSL:1m;
    #    ssl_session_timeout  5m;
    #    ssl_ciphers  HIGH:!aNULL:!MD5;
    #    ssl_prefer_server_ciphers  on;
    #    location / {
    #        root   html;
    #        index  index.html index.htm;
    #    }
    #}
}
[^1]: # 二 安装mysql
docker login --username=akeys registry.cn-chengdu.aliyuncs.com
docker pull registry.cn-chengdu.aliyuncs.com/keys-docker-hub/mysql:8.1.0
# Ubuntu
sudo mkdir -p /tmp/mysql/data && sudo mkdir -p /tmp/mysql/conf && sudo gedit /tmp/mysql/conf/my.cnf
# Centos
sudo mkdir -p /tmp/mysql/data && sudo mkdir -p /tmp/mysql/conf && sudo vim /tmp/mysql/conf/my.cnf
**mysql配置文件: vim** **/tmp/mysql/conf/my.cnf**
[client]
default-character-set=utf8
[mysql]
default-character-set=utf8
[mysqld]
init_connect='SET collation_ connection = utf8mb4_unicode_ci'
init_connect='SET NAMES utf8'
character-set-server=utf8mb4
collation-server=utf8mb4_unicode_ci
skip-character-set-client-handshake
skip-name-resolve
主库配置
# mysql服务ID,保证整个集群环境中唯一,取值范围:1---2^32-1,默认为1
server-id=1
# 是否只读,1代表只读,0代表读写
read-only=0
# 忽略的数据,指不需要同步的数据库
#binlog-ignore-db=mysql
# 指定同步的数据库
#binlog-do-db=db01
从库配置
# mysql服务ID,保证整个集群环境中唯一,取值范围:1---2^32-1,默认为1
server-id=2
# 是否只读,1代表只读,0代表读写
read-only=1
# 忽略的数据,指不需要同步的数据库
#binlog-ignore-db=mysql
# 指定同步的数据库
#binlog-do-db=db01
启动mysql
# 第一个3306是物理机端口,第二个3306是docker容器端口
docker run --name mysql \
-v /tmp/mysql/conf/my.cnf:/etc/mysql/my.cnf \
-v /tmp/mysql/data:/var/lib/mysql \
-e MYSQL_ROOT_PASSWORD=root \
-p 3306:3306 \
-d registry.cn-chengdu.aliyuncs.com/keys-docker-hub/mysql:8.1.0
然后修改权限
# 进入mysql容器:
docker exec -it mysql /bin/bash
# 登录mysql:
mysql -uroot -proot
# 修改密码:记得flush privileges一下
ALTER USER 'root'@'%' IDENTIFIED BY 'G#t9WhZr2@qL7BmPnXeD';
flush privileges;
# 修改了之后,如果exit退出去再重进还是没修改的话,不用理他,其实已经修改了的!用Navicat来连就知道了,意思就是拿Navicat来测
主库配置
CREATE USER 'itcast'@'%' IDENTIFIED WITH mysql_native_password BY 'Root@123456';
GRANT REPLICATION SLAVE ON *.* TO 'itcast'@'%';
# 查看binlog文件位置的命令
show master status;
从库配置
change replication source to SOURCE_HOST='主库IP',SOURCE_USER='主库设置的用户名',SOURCE_PASSWORD='主库设置的密码',SOURCE_LOG_FILE='主库log文件位置',SOURCE_LOG_POS=同步主库的开始位置;
# 例子:
change replication source to SOURCE_HOST='192.168.126.132',SOURCE_USER='itcast',SOURCE_PASSWORD='Root@123456',SOURCE_LOG_FILE='binlog.000002',SOURCE_LOG_POS=664;
# 开启同步操作
start replica;
# 查看主从同步状态
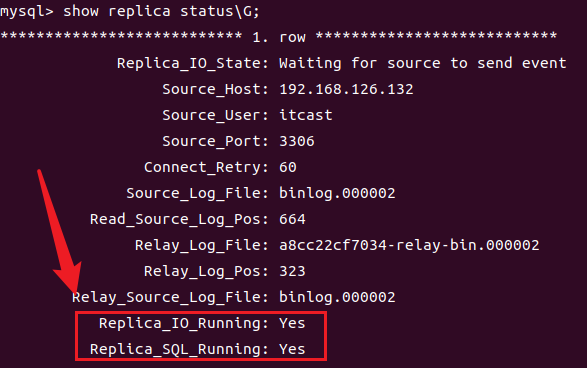
show replica status\G;
下图所示红框都是Yes说明主从复制开启成功!
> 测试是否已经部署成功
>
create database db01;
use db01;
create table tb_user(
id int(11)primary key not null auto_increment,
name varchar(50)not null,
sex varchar(1)
)engine=innodb default charset=utf8mb4;
insert into tb_user(id,name,sex)values(null,'Tom','1'),(null,'Keys','1'),(null,'HaHa','1');
主库中执行上述语句,看看从库有没有作相应改变,如果有,则完结撒花!!!
如果主库中已经存在数据了,可以先把主库中的数据导出到一个sql文件中,然后在从库中执行这个sql文件,再开启同步即可
All articles on this blog are licensed under CC BY-NC-SA 4.0 unless otherwise stated.
Comments