📇 本类导航
本页自动汇总「Redis」分类下的全部笔记(含子分类),随笔记增删实时更新。
1、安装Redis依赖
Redis是基于C语言编写的,因此首先需要安装Redis所需要的gcc依赖:
yum install -y gcc tcl2、下载压缩包
进入/usr/local/src文件夹,个人比较喜欢放在这个文件夹,至于你喜欢放在哪,你自己定
cd /usr/local/src**下载压缩包,据说5.0.4这个版本比较稳定,如果需要下载其他版本的话,可以先访问Redis的Linux压缩包地址:**https://download.redis.io/releases/ ,看看自己需要哪个版本的,再小改一下下面命令的包名就行
wget http://download.redis.io/releases/redis-5.0.4.tar.gz解压压缩包
tar -xzvf redis-5.0.4.tar.gz解压后:
进入redis目录:cd redis-5.0.4运行编译命令(需要一点时间,请耐心等待**** ):
make && make install如果没有出错,应该就安装成功了。
默认的安装路径是在 /usr/local/bin目录下:
该目录以及默认配置到环境变量,因此可以在任意目录下运行这些命令。其中:redis-cli:是redis提供的命令行客户端
redis-server:是redis的服务端启动脚本
redis-sentinel:是redis的哨兵启动脚本3、指定配置启动
**如果要让Redis以后台方式启动,则必须修改Redis配置文件,路径:(** /usr/local/src/redis-5.0.4 ),名字叫redis.conf:
我们先将这个配置文件备份一份:cp redis.conf redis.conf.bck然后修改redis.conf文件中的一些配置:
vim redis.conf**(**主要修改第 3 、5、7、9 行的配置 ),剩下的配置按需修改,至于怎么找到这些配置,可以用记事本的查找功能
# 允许访问的地址,默认是127.0.0.1,会导致只能在本地访问。修改为0.0.0.0则可以在任意IP访问,生产环境不要设置为0.0.0.0
#=========== 注意生产环境不要设置为0.0.0.0 ===========#
bind 0.0.0.0
# 守护进程,修改为yes后即可后台运行
daemonize yes
# 密码,设置后访问Redis必须输入密码
requirepass X7#kLp!2fQ@5z
# 日志文件,默认为空,不记录日志,可以指定日志文件名
logfile "redis.log"
** Redis的其它常见配置 **
# 监听的端口
port 6379
# 工作目录,默认是当前目录,也就是运行redis-server时的命令,日志、持久化等文件会保存在这个目录
dir .
# 数据库数量,设置为16,代表所有库都使用,默认有16个库,编号0~15
databases 16
# 设置redis能够使用的最大内存
maxmemory 512mb
4、启动Redis
# 进入redis解压目录
cd /usr/local/src/redis-5.0.4
# 启动服务: redis-server redis.conf # 停止服务: # 利用redis-cli来执行 shutdown 命令,即可停止 Redis 服务 # 因为之前配置了密码,因此需要通过 -u 来指定密码 # 123456是你在配置文件里面设置的密码 redis-cli -a X7#kLp!2fQ@5z shutdown5、开机自启
我们也可以通过配置来实现开机自启。
首先,新建一个系统服务文件:vi /etc/systemd/system/redis.service内容如下:
[Unit]
Description=redis-server
After=network.target
[Service]
Type=forking
ExecStart=/usr/local/bin/redis-server /usr/local/src/redis-5.0.4/redis.conf
PrivateTmp=true
[Install]
WantedBy=multi-user.target
然后重载系统服务:
systemctl daemon-reload现在,我们可以用下面这组命令来操作redis了:
# 启动
systemctl start redis
# 停止
systemctl stop redis
# 重启
systemctl restart redis
# 查看状态
systemctl status redis
执行下面的命令,可以让redis开机自启:
systemctl enable redis
一、客户端连接
redis-cli -h host -p port -a password
输入命令:redis-cli -p 6379
二、数据导出导入
导出
执行备份命令:save
该命令将在 redis 备份目录中创建dump.rdb文件。
查看备份路径:config get dir
备份后的文件名:dump.rdb
导入
1、将dump.rdb拷贝到目标机,备份文件的目录下(如果开始不知道备份文件的目录在哪,可以使用Redis Desktop Manager软件在连接处打开控制台,输入save,看看生成的.rdb文件在哪,就知道备份文件的目录了),覆盖式导入
2、重启redis服务
3、打开客户端刷新就能看到新的数据了
三、Redis string命令
# 增、改
set key value
mset k1 v1 k2 v2... //新增多个
# 删
del key
# 查
get key
mget k1、k2、k3... //查多个
四、Redis hash命令
# 增加一列、改
hset key 键 值
hmset key 键1 值1 键2 值2//增加多列
# 查
hget key 键
hgetall key //获取所有键对应的值
# 删
hdel key //删除整个hash
hdel key 键 //删除单个键
五、Redis list命令
lpush key value //左增    rpush key value //右增
lpop  key value //左删    rpop  key value //右删
rpush key v1 v2 v3... //插入多个
# 查所有
lrange key 0 -1
六、Redis set命令
# 增
sadd key value
# 查所有
smembers key
缓存的意义在于可以保护后台的接口不被大量的请求所攻击
逻辑是这样的:
1、客户端第一次请求的话,先从数据库中查询到数据并将其写入Redis缓存中,后面都是直接从Redis里面读
2、(最简单的处理,如需复杂一点的处理,后面再跟进记录**** )除了查询,如果后台对数据进行了增加、修改、删除,那么后台会把Redis缓存清除(对应的键值),前端再次请求,还是从数据库里面获取并将其写入Redis缓存
1、下载Redis压缩包
以下这个是我网盘里面的(这个是v8.0版本的,支持导入.rdb数据文件),后面小改一下路径即可
链接:https://pan.baidu.com/s/18dT-0rMtZWQThhVrBtP88A?pwd=x0f1提取码:x0f1
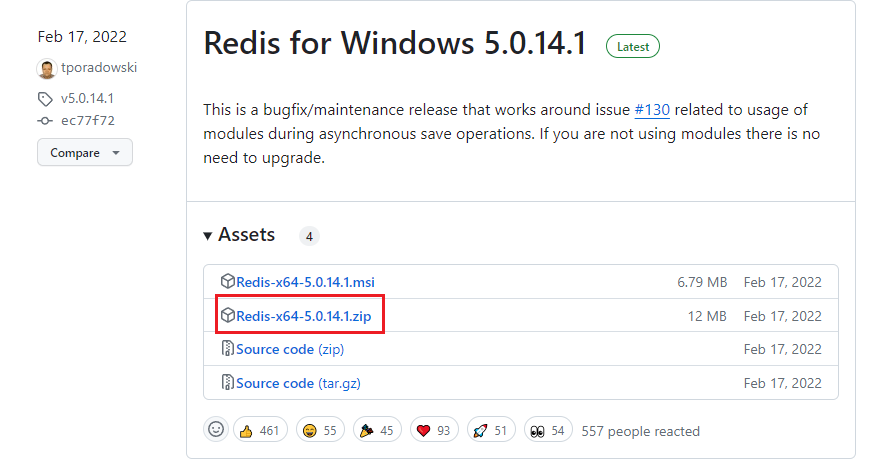
这里我在GitHub中下载window用的 5.0 版本Redis-x64-5.0.14.1.zip。 https://github.com/tporadowski/redis/releases
以下操作示例是下载的v8.0版本
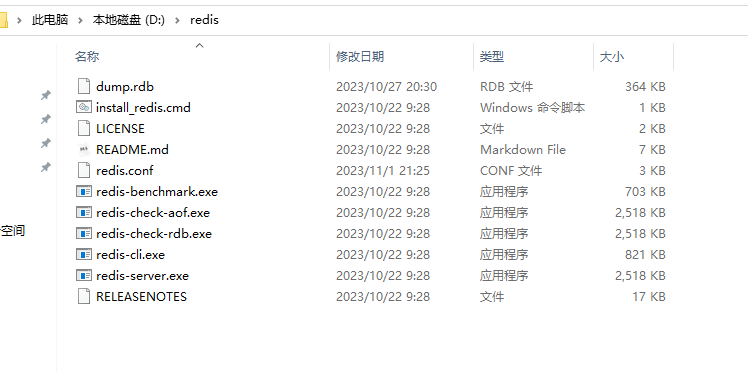
将下载的压缩包解压到指定的文件夹中,如:D:\redis,内容如下:
3、修改redis.conf
# Save the DB to disk.
# save <seconds> <changes> [<seconds> <changes> ...]
#
# Redis will save the DB if the given number of seconds elapsed and it
# surpassed the given number of write operations against the DB.
#
# Snapshotting can be completely disabled with a single empty string argument
# as in following example:
#
# save ""
#
# Unless specified otherwise, by default Redis will save the DB:
#   * After 3600 seconds (an hour) if at least 1 change was performed
#   * After 300 seconds (5 minutes) if at least 100 changes were performed
#   * After 60 seconds if at least 10000 changes were performed
#
# You can set these explicitly by uncommenting the following line.
#
# save 3600 1 300 100 60 10000
save ""
port 6379
requirepass '123456'
maxmemory 256mb
appendonly no
maxmemory-policy allkeys-lru
# Examples:
#
# bind 192.168.1.100 10.0.0.1     # listens on two specific IPv4 addresses
# bind 127.0.0.1 ::1              # listens on loopback IPv4 and IPv6
# bind * -::*                     # like the default, all available interfaces
#
# ~~~ WARNING ~~~ If the computer running Redis is directly exposed to the
# internet, binding to all the interfaces is dangerous and will expose the
# instance to everybody on the internet. So by default we uncomment the
# following bind directive, that will force Redis to listen only on the
# IPv4 and IPv6 (if available) loopback interface addresses (this means Redis
# will only be able to accept client connections from the same host that it is
# running on).
#
# IF YOU ARE SURE YOU WANT YOUR INSTANCE TO LISTEN TO ALL THE INTERFACES
# COMMENT OUT THE FOLLOWING LINE.
#
# You will also need to set a password unless you explicitly disable protected
# mode.
# ~~~~~~~~~~~~~~~~~~~~~~~~~~~~~~~~~~~~~~~~~~~~~~~~~~~~~~~~~~~~~~~~~~~~~~~~
bind 127.0.0.1
# Redis supports recording timestamp annotations in the AOF to support restoring
# the data from a specific point-in-time. However, using this capability changes
# the AOF format in a way that may not be compatible with existing AOF parsers.
#aof-timestamp-enabled no
# Since version 5 of RDB a CRC64 checksum is placed at the end of the file.
# This makes the format more resistant to corruption but there is a performance
# hit to pay (around 10%) when saving and loading RDB files, so you can disable it
# for maximum performances.
#
# RDB files created with checksum disabled have a checksum of zero that will
# tell the loading code to skip the check.
rdbchecksum no
# By default protected mode is enabled. You should disable it only if
# you are sure you want clients from other hosts to connect to Redis
# even if no authentication is configured.
protected-mode yes
4、启动Redis服务
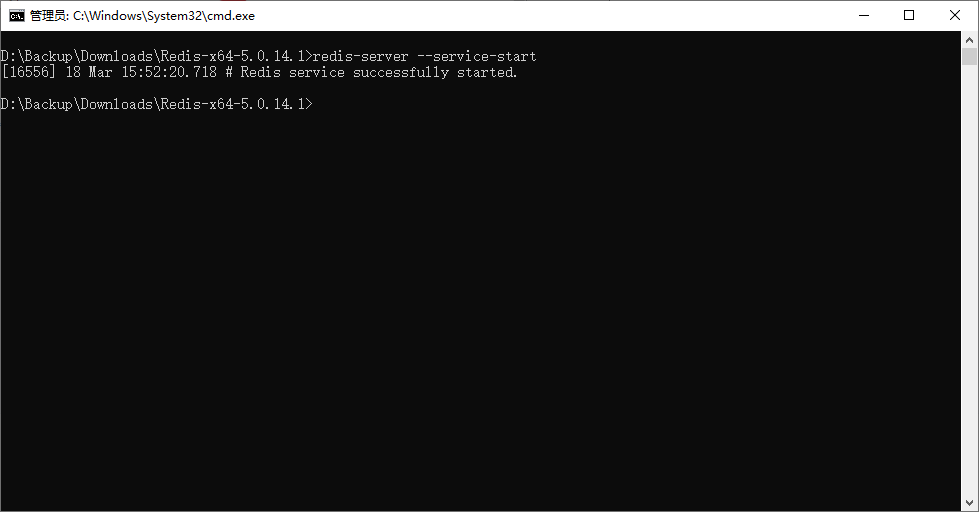
在Redis的安装目录下打开cmd窗口,然后执行命令来启动服务:
redis-server --service-start
出现以上提示则表示启动成功嘻嘻嘻
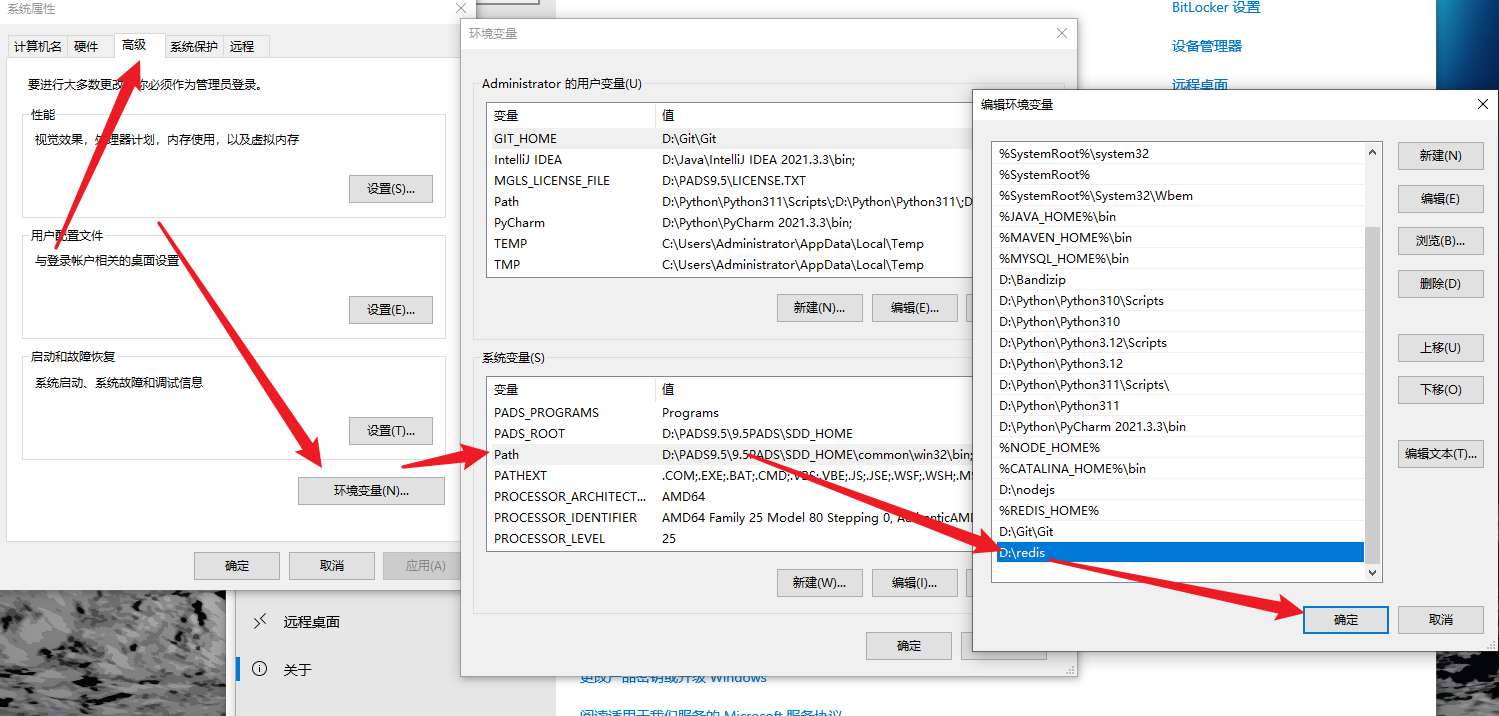
为了方便,建议把Redis路径配置到系统变量Path值中,这样就省得再输路径了。
Redis常用的服务指令
# 卸载服务
redis-server --service-uninstall
# 开启服务
redis-server --service-start
# 停止服务
redis-server --service-stop
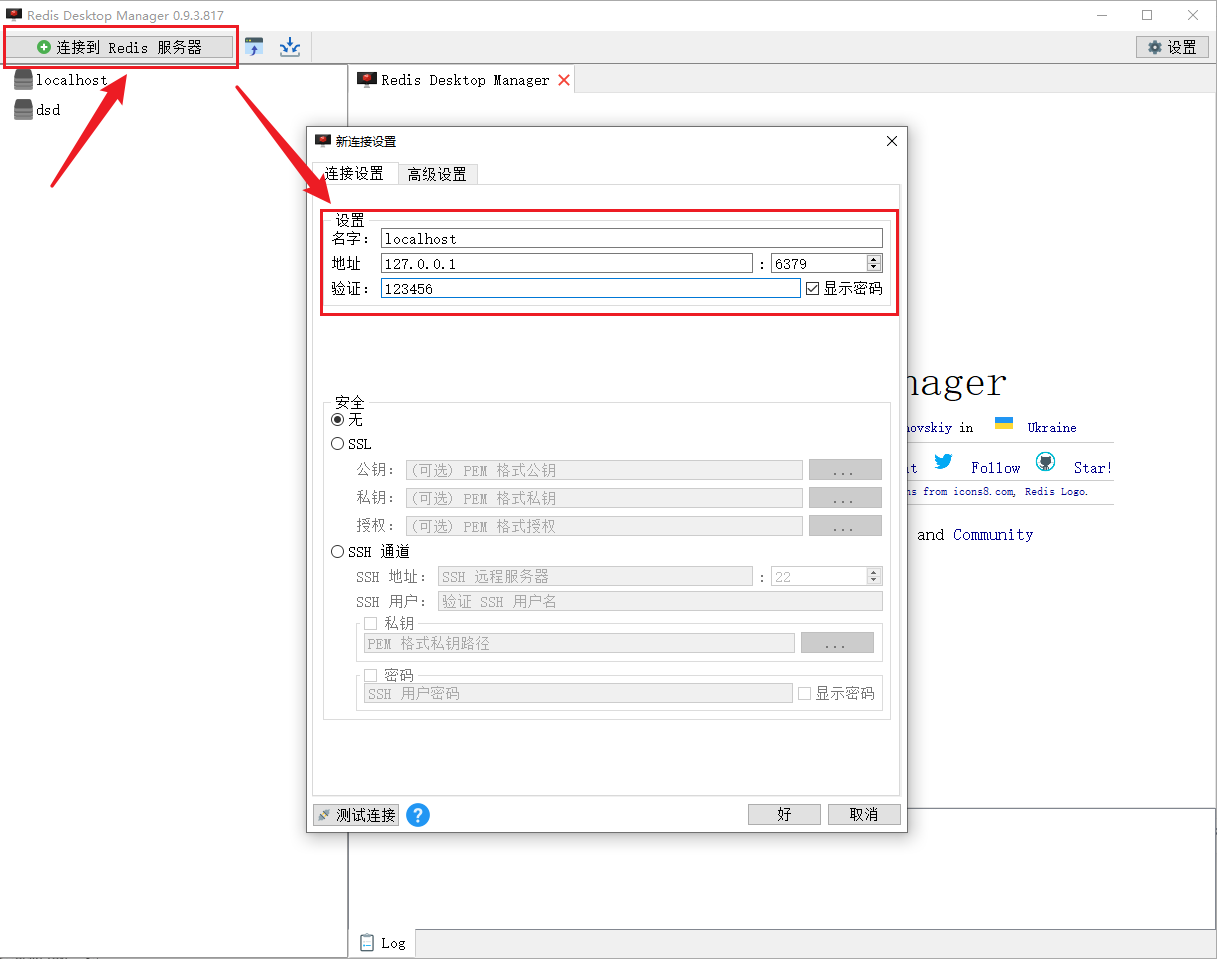
二、使用可视化工具
Redis Desktop Manager
需要安装使用,0.9.4以上是要收费的
链接:https://pan.baidu.com/s/1wpqa3tViWm_2is0kWJfA4g?pwd=qwqp提取码:qwqp
把安装包下载下来,改一下安装路径,然后不断下一步即可
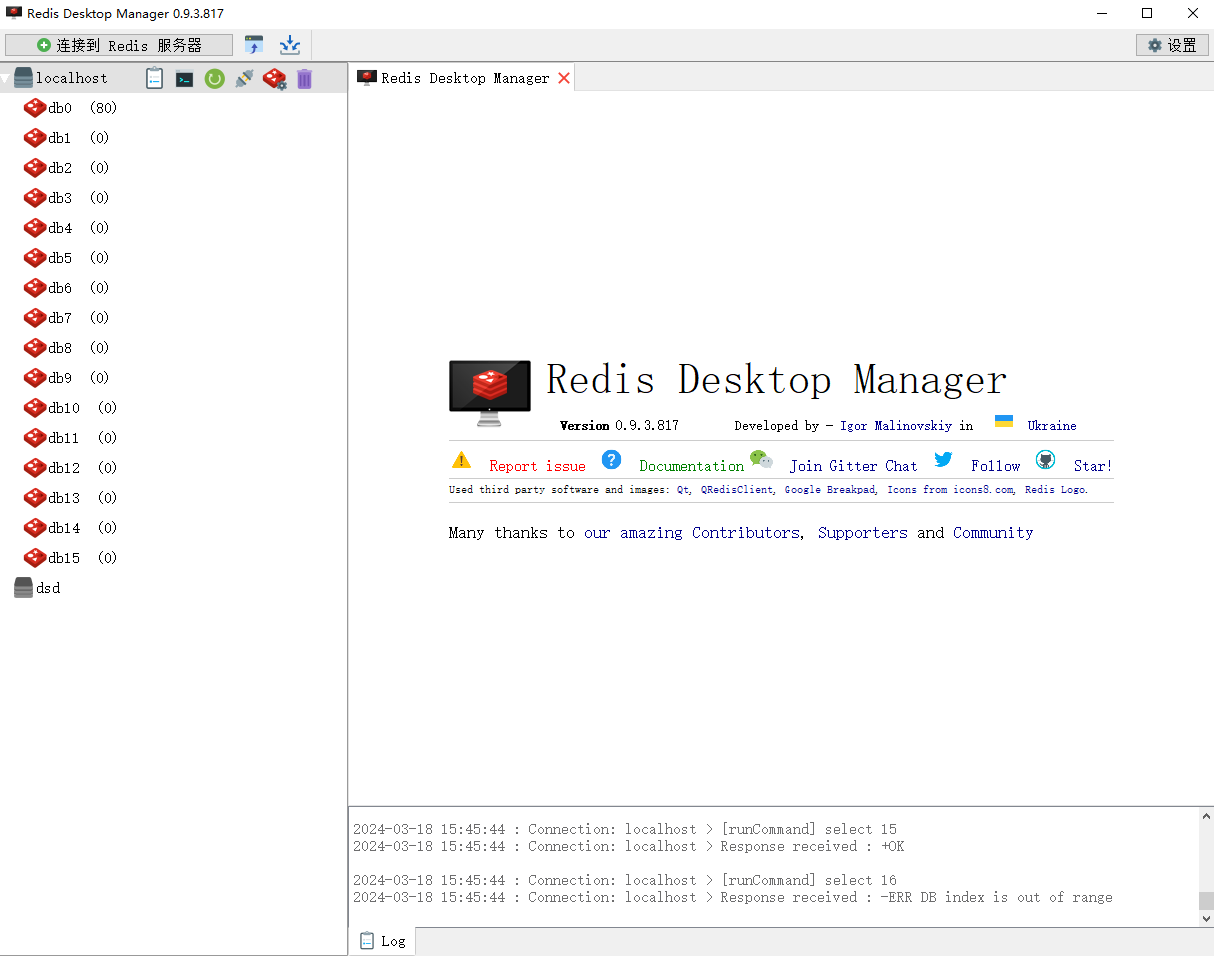
无需任何配置直接连接-》
界面如下: